# Setting up your AWS Credentials
If you're intimidated by setting this up please don't be. If you're like us you've maybe logged into AWS Console, seen the 1000 products, and ran the other way. Below we have step-by-step instructions on how to setup AWS for Mothership. Essentially, we need a user for Mothership to access your AWS and an S3 bucket to store your backups. Let's get started!
# Sign Up / Sign In to AWS
- To get your AWS Credentials needed for mothership signup or sign in at (https://aws.amazon.com/)[https://aws.amazon.com/] and get to the AWS Management Console (main screen with all the services).
Do note that you will incur some cost from S3 storage on Amazon Web Services. However, for most sites / applications this cost should be minimal (100 GB is about $2.18 / mo) and the benefit is that you can be assured you are in total control of your files.
# IAM: The User Mothership Logs In As
Head to the IAM section which is where you define all the users for your account.
Click "Users" on the left menu and then the blue "Add user" button at the top of the screen.
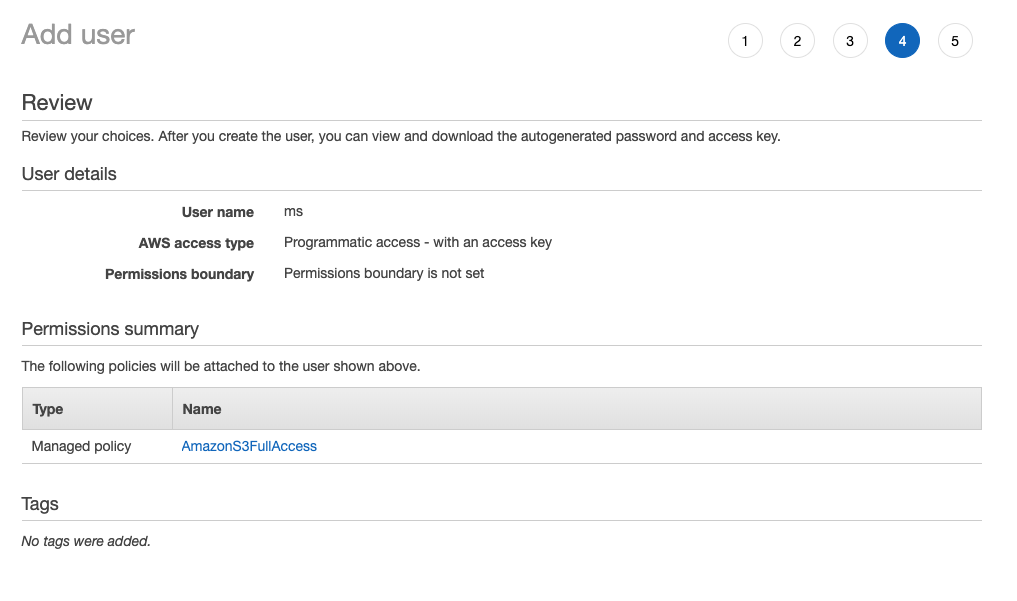
For "User Name" type "Mothership" (or anything you want to identify this user as Mothership)
For "Access Type" select "Programmic access"
Click "Next: Permissions"
Click the "Attach existing policies directly" option along the top and in the search type S3. Then check off AmazonS3FullAccess. This gives Mothership read and write access to your S3 storage for this account so ensure that you're comfortable with that. Note: that files never come through Mothership servers but we do need to know what buckets are avaiable for the Mothership to backup to, delete old backups that Mothership has generated in the past, and to point your machine to current backups when syncing. These are the only operations we perform on your buckets.
Click Next: Tags and add any tags if you want to organize this user in some way. Totally optional.
Click Next: Review and you should have a screen that looks like this:

- Click Create user and you should see something similar to what is below.

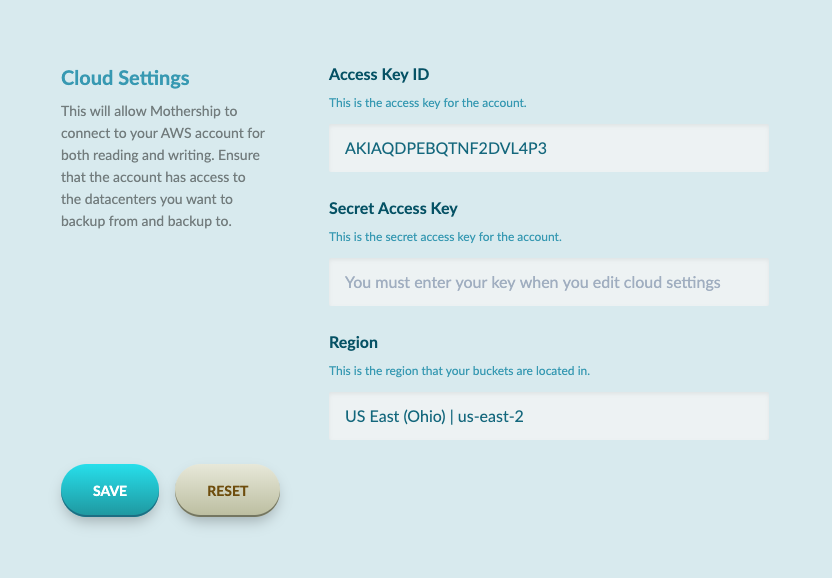
- Make sure you grab the Access Key ID and Secret Access Key and put them in the Mothership Cloud Credentials form in your project.

# S3: The storage where your backups will be placed
Now we need a bucket in your S3 to put your backups in. Click Services in the top left-hand corner and select "S3".
Click Create bucket
For Bucket Name put in something like mothership.app or my-pplication-name
Select the region you wish you store your backups in. We suggest, if you are using AWS for your application hosting to store it in another datacenter in case aliens attack and take that one out.
Click next to get to the Properties section. These settings are entirely up to you. When you are done click next.
You can leaved Block all public access checked since Mothership sync uses the AWS CLI. Click Next.
Click Create bucket
# Give Mothership Access
- Finish filling out the cloud credentials on Mothership. Ensure you pick the region you placed your bucket in.

Ok! You're all set. The buckets should sync within a minute or so but if you're impatient you can click the "Sync Buckets" button. If you ever do add new buckets to your account you'll need to click that button to pull them in.
